| This article is part of a collection for the walkthrough for Part One. The previous article is Lesson 7. The next article is The Golden Chalice. |

Mysterious figures
Overview[]
This quest is received from Master Nathan right after completing the seven lessons and it is the first mission for the Princess as a full member of The Family.
Nathan asks the Princess to find the people she had overheard scheming against The Family with the Dhorn during Lesson 3. During this mission the Princess once again meets Caron and Vico. There are two possible ways of ultimately verifying the identity of the spies once the Princess has her suspicions, one of which involves a rather nasty and violent group sex scene. Symbolically speaking this quest signifies the Princess moving on from the kitchens and training period and her joining with the brutal reality of The Family's struggle.
Notes[]
- During this quest the Princess witnesses Vico's fighting style and combat abilities for the first time.
- It may be prudent to complete this quest prior to the Dhorn Slayer quest, since the Princess may need Jero to take an oportunity to do some, vengeance related, side quest which arises during this quest.
Walkthrough[]
|

This is a mandatory quest during Chapter 2 of Part One.
Go to your apartment at 2, Acorn Street (Betancuria North) and get some rest. Before you fall asleep, your interest is piqued by the sound of water running under the house, hinting at a nearby entrance to the sewers.
Investigating your neighbor[]

Break into 1, Acorn Street next door. Pick Pocket Bognar's key from him to unlock the door to his cellar. Enter the sewers. You will notice this was the place where you overheard the two people talking during Lesson 3.
| Note: If you did not overhear the conversation in the sewers, the door in the cellar will not open and there will be nothing to question Bognar about. See the FAQ for more information. |
As soon as you enter the sewers, you will see a figure. It will be Caron who is seriously messed up. You will find that his gut has been split open and his tongue cut out. Unfortunately there isn't much you can do for him, and he will die on you.
Proceed through the door nearby. If you sneak, you can hear two Dhorn talk about how they tortured Caron but didn't really get any useful information from him. Note that killing them here is a challenging task, but you can get another shot at them individually during the A Death in the Family quest, which should be completed before taking Jacia Colds's Dhorn Slayer quest.
Go back upstairs and talk to Bognar, who will subsequently attack you. Fight him near death and he will yield (sometimes stopping the fighting can be difficult, you can try putting your weapon away once he states his wish to yield, so that it's more difficult to kill him by accident). Talk to him again, and he will eventually tell you about some men smelling of oil and sweat using his cellar to meet with the Dhorn. After this you can let him go or kill him (both extorting money from him and killing him will adjust your alignment towards evil). Report this all to Master Nathan. You can take Caron's body to him and Nathan will make sure that a service will be performed.
| Note: If Bognar dies, you can just continue on to the Arena. His conversation gives you some direction on the identities of the mysterious figures seen earlier in the Sewers, but it is not required to proceed. |
Investigating the oil[]
You can ask the staff at Carla's Beauty Palace and the Bath House in Betancuria North about the oil. The slick and smelly trail leads to the Arena...
Option one[]

Go to the Arena in Betancuria West and talk to the ticket vendor. She will tell you that Sharita Senneset may be able to arrange you a rendezvous with the gladiators.
Sharita used to run a bordello in Betancuria South called The Wildcat, but the Dhorn closed it down, and now she hangs out at The Lion's Head Inn. Go there and talk to her. Either Bluff (need a skill of 7), Persuade (need a skill of 8) or Intimidate (need a skill of 7) her into arranging you to meet the gladiators for 50 gold, or pay her 1000 gold for it. She will take you to a tunnel leading the gladiators' quarters at the Arena.
When you get to the Gladiator Pits, you will encounter a rather large gladiator who will question you (#10, below). If you've been to The Swordfish, either through Jacia's Messenger quest or on your own, you might recognize him.
You have the following options:
- Do as he demands and get brutally "taken" by all the gladiators including the one you saw in the sewers.
- Fight him and sneak out. Note that the fight is tough and you will benefit from damage reduction gear, and you may need some good lock tools for the doors (DC40 and DC35). Once the first gladiator is dead, take his key and enter the main area (#9). There's a small chest (DC30) with a +1 greataxe, some Gloves of the Minstrel, and a +8 thieves' tools. Sneak past the gladiators, unlock the two hallway doors, then follow the hallway west. When you reach the three guards, take the stairs up (#8). Watch out for a pair of gargoyles (#6) on the upper floor, then use the gladiator's key to unlock the final door (#5) and exit the arena (#1).
| Note: In earlier version of the game it was possible to exit via a portal next to the gladiator's bedroom. |
Option two[]

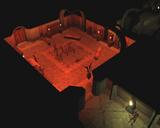
The Gladiator Pits

Go to the Arena in Betancuria West and break into the lower levels. Note that some of the Pick Lock checks are extremely difficult.
The door leading down to the gladiators (#5, DC47) is right behind the ticket vendor and noted with a sign. Before heading down, you may want to check out the door to the left (DC44), which is the treasury and archives (#4). Watch out for the spike trap on the floor. The chest next to the guard (DC42) has small amount of gold. The real treasure of 12,000 gold pieces is in a hidden chest (DC48) behind the second bookshelf. Destroy the bookshelf and break into the chest.
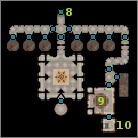
Sneak through the center door (#5), past the two gargoyles (#6), and down the stairs to the Gladiator Pits (#7). Continue past the guards and follow the hallway east, past the caged creatures (whose doors can be unlocked for some XP), and then south. Unlock the two doors and enter the main area (#9), where you should recognize one the gladiators as the man you saw in the sewers. There's a small chest in the main room (DC30) with a +1 greataxe, some Gloves of the Minstrel, and a +8 thieves' tools. Return the way you came (#8) and exit the arena (#1).
The resolution[]
Return to Master Nathan and present him with the evidence you have found. He will send you, Vico and possibly more Family members - such as Ramir Smith, Donan Kensbanner and Carana Menner - to take care of the gladiators. The number of helpers depends on your indication of how many gladiators and guards there are, none if you say there were two or three, two helpers if you say there were four or five and a couple of guards and three if you claim there was at least a dozen gladiators. Return to Nathan once all the gladiators are dead to claim your reward.
Continue Chapter 2 of Part One.
| This article is part of a collection for the walkthrough for Part One. The previous article is Lesson 7. The next article is The Golden Chalice. |